自学k8s系列~05之Service

Service作用

  • Service 通过 labelPod 聚合起来。
  • 为这一组 Pod 提供统一的访问入口(IP和域名)。
  • 将访问的请求负载到 Pod 上。

Pod 是容器的载体本身是不稳定的,但是 Service 是稳定的。

Service定义

1
2
3
4
5
6
7
8
9
10
11
12
13
14
15
16
17
18
19
20
21
22
23
24
25
 apiVersion: v1             # Required
kind: Service # Required
metadata: # Required
name: string # Required
namespace: string # Required
labels:
- name: string
annotations:
- name: string
spec: # Required
selector: [] # Required
type: string # Required
clusterIP: string
sessionAffinity: string
ports:
- name: string
protocol: string
port: int
targetPort: int
nodePort: int
status:
loadBalancer:
ingress:
ip: string
hostname: string

Service的基本使用

1
2
3
4
5
6
7
8
9
10
apiVersion: v1
kind: Service
metadata:
name: webapp
spec:
selector:
app: webapp
ports:
- port: 8081
targetPort: 8081

kind 指定 Service , selector 选择指定的 label ,会将 label 包含 app:web 的所有 Pod 都加到这个 Service 中来。

1
kubectl apply -f ./service_create.yaml

Service的访问

  • IP: Service 拥有自己的 IP 可以使用该 IP 进行访问,访问进来后会将请求负载到某一个 Pod 上。
  • DNS: Service 也可以通过域名进行访问。DNS 需要部署 core-dns 或其他 DNS 组件,后面专门研究。

Service负载策略

  • RoundRobin: 轮询模式,即每一次请求都按次序分发到每一个 Pod 上。
  • SessionAffinity: 会话亲和模式,即基于客户端 IP 进行会话保持,第一次将请求分发到哪一个 Pod 之后的请求全都分发到该 Pod 上。

Service多端口

  • 同协议:需要指定名称

    1
    2
    3
    4
    5
    6
    7
    8
    9
    10
    11
    12
    13
    14
    apiVersion: v1
    kind: Service
    metadata:
    name: webapp
    spec:
    selector:
    app: webapp
    ports:
    - port: 8081 #第一个端口
    targetPort: 8081
    name: web
    - port: 8002 #第二个端口
    targetPort: 8002
    name: manager
  • 不同协议

    1
    2
    3
    4
    5
    6
    7
    8
    9
    10
    11
    12
    13
    14
    apiVersion: v1
    kind: Service
    metadata:
    name: webapp
    spec:
    selector:
    app: webapp
    ports:
    - name: dns
    port: 53
    portocol: UDP #指定 UDP 协议
    - name: dns-tcp
    port: 53
    portocol: TCP #指定 TCP 协议

外部服务Service

场景:需要将数据库或其他 namespace 中的服务做为后端服务。可以创建一个没有 label selector 的 Service。然后再手动创建一个和 Service 同名的 Endpoints

  • Service

    1
    2
    3
    4
    5
    6
    7
    8
    apiVersion: v1
    kind: Service
    metadata:
    name: webapp
    spec:
    ports:
    - port: 8081
    targetPort: 8081
  • EndPoint

    1
    2
    3
    4
    5
    6
    7
    8
    9
    apiVersion: v1
    kind: Service
    metadata:
    name: webapp
    subsets:
    - address:
    - IP: 1.2.3.4
    ports:
    - port: 8081
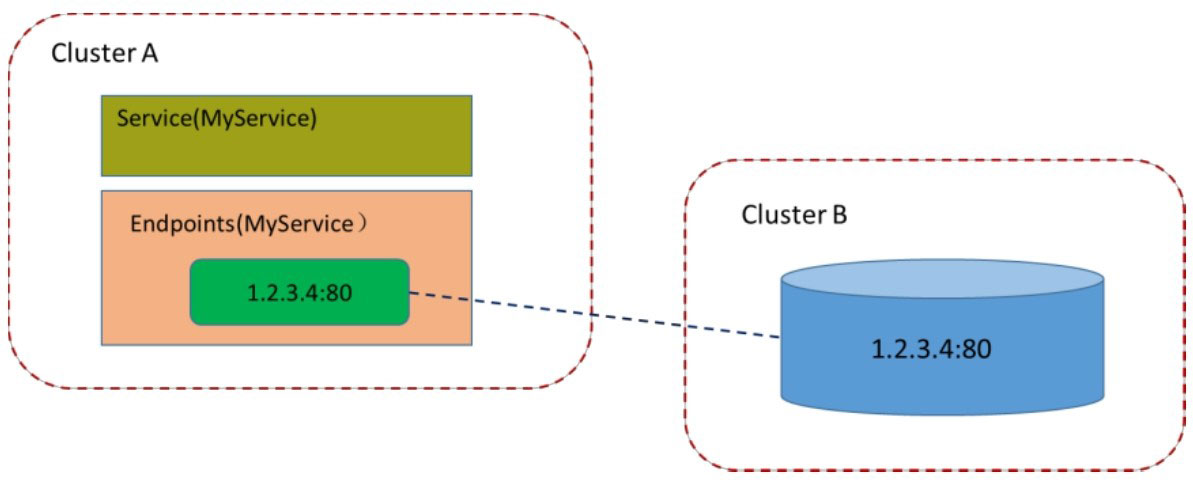
Service指向外部服务

集群外访问Service

PodService 都是 k8s 中的概念,对于外部来说都是无法感知的。为了让宿主机能够访问这些服务,可以将PodService 的端口号映射到宿主机,使客户端能够通过物理机访问容器内的应用。

将Pod的端口号映射到宿主机

端口映射

  • 创建 nginx 的 Pod
1
2
3
4
5
6
7
8
9
10
11
12
13
apiVersion: v1
kind: Pod
metadata:
name: nginx #指定 Pod名称
labels:
name: nginx
spec:
containers:
- name: nginx
image: nginx
ports:
- containerPort: 80
hostPort: 81
1
kubectl apply -f ./pod_mapping.yaml
  • 查看 Pod 状态
1
2
3
4
kubectl get pod nginx

NAME READY STATUS RESTARTS AGE IP NODE NOMINATED NODE READINESS GATES
webapp 1/1 Running 0 61m 172.17.0.7 minikube <none> <none>

如果看 STATUS 状态不是 Running 的话,说明该 Pod 未启动成功

  • 登录 Node 访问该端口
1
2
3
minikube ssh
curl 127.0.0.1:81 #前面指定了映射端口是 81
curl 192.168.49.2:81 # Node 的 IP 地址是 192.168.49.2,使用这个 IP 地址与上面效果相同

使用 kubectl get node -o wide 可以查看 Node 的 IP 地址

  • 在查看 Pod 的日志
1
2
3
4
5
6
7
8
9
10
11
12
13
14
15
16
17
18
19
20
21
22
23
24
25
26
kubectl logs -f nginx

/docker-entrypoint.sh: /docker-entrypoint.d/ is not empty, will attempt to perform configuration
/docker-entrypoint.sh: Looking for shell scripts in /docker-entrypoint.d/
/docker-entrypoint.sh: Launching /docker-entrypoint.d/10-listen-on-ipv6-by-default.sh
10-listen-on-ipv6-by-default.sh: info: Getting the checksum of /etc/nginx/conf.d/default.conf
10-listen-on-ipv6-by-default.sh: info: Enabled listen on IPv6 in /etc/nginx/conf.d/default.conf
/docker-entrypoint.sh: Launching /docker-entrypoint.d/20-envsubst-on-templates.sh
/docker-entrypoint.sh: Launching /docker-entrypoint.d/30-tune-worker-processes.sh
/docker-entrypoint.sh: Configuration complete; ready for start up
2021/09/05 13:40:57 [notice] 1#1: using the "epoll" event method
2021/09/05 13:40:57 [notice] 1#1: nginx/1.21.1
2021/09/05 13:40:57 [notice] 1#1: built by gcc 8.3.0 (Debian 8.3.0-6)
2021/09/05 13:40:57 [notice] 1#1: OS: Linux 5.10.47-linuxkit
2021/09/05 13:40:57 [notice] 1#1: getrlimit(RLIMIT_NOFILE): 1048576:1048576
2021/09/05 13:40:57 [notice] 1#1: start worker processes
2021/09/05 13:40:57 [notice] 1#1: start worker process 32
2021/09/05 13:40:57 [notice] 1#1: start worker process 33
2021/09/05 13:40:57 [notice] 1#1: start worker process 34
2021/09/05 13:40:57 [notice] 1#1: start worker process 35
2021/09/05 13:40:57 [notice] 1#1: start worker process 36
2021/09/05 13:40:57 [notice] 1#1: start worker process 37


172.17.0.1 - - [05/Sep/2021:13:41:36 +0000] "GET / HTTP/1.1" 200 612 "-" "curl/7.68.0" "-"
192.168.49.2 - - [05/Sep/2021:13:46:06 +0000] "GET / HTTP/1.1" 200 612 "-" "curl/7.68.0" "-"

设置hostNetwork

通过设置 hostNetwork=true 将 Pod 中的端口暴露出来,本质上也是暴露端口,只是 hostNetwork 是将所有端口都暴露。

  • 创建 Pod
1
2
3
4
5
6
7
8
9
10
11
12
13
apiVersion: v1
kind: Pod
metadata:
name: nginx
labels:
name: nginx
spec:
hostNetwork: true #设置为 true
containers:
- name: nginx
image: nginx
ports:
- containerPort: 80
1
kubectl apply -f ./pod_mapping.yaml

后面操作与上面一致,登录 node 访问nginx,通过查看日志判断是否有请求到。

将Service的端口号映射到宿主机

映射Service端口

  • 创建 Service
1
2
3
4
5
6
7
8
9
10
11
12
apiVersion: v1
kind: Service
metadata:
name: webapp
spec:
selector:
app: webapp
type: NodePort
ports:
- port: 80
targetPort: 80
nodePort: 30000 #
1
kubectl apply -f ./service_mapping.yaml
  • 访问 nginx
1
curl 127.0.0.1:30000
  • 通过查看 nginx Pod 的日志判断是否请求进来

设置 LoadBalancer

例如: 阿里云 SLB

DNS服务

Kubernetes 1.11 版本开始, DNS 服务由 CoreDNS 提供。

Ingress: HTTP 7层路由

在我们部署应用时,我们很多时候的需求是这样的:

https://xxx.xx/api 希望将请求打到 api 的 Service 上;

https://xxx.xx/web 希望将请求打到 web 的 Service 上;

同时,我们的端口是同一个端口。即是通过 uri 来区分不同的服务。这个功能就需要使用到 Ingress 来进行 HTTP 层的路由转发。